Conditional Formatting may be applied to Text Box and Combo Box controls on Access Forms and Reports. It allows us to format the data contained in a particular Text or Combo Box, according to value of that same data. For example we can create Conditional Formatting for a text box to display a currency value, which when less than 0, will display that value in a red font, instead of the normal black.
Moreover, as well as formatting the Text or Combo Box according to the value contained in that same control, we can also format the Text or Combo box according to the value contained in another field of the same record. So, for example, we can display a Text Box containing a CompanyName in bold font if the value of its AnnualTurnover field is greater than or equal to, say, £100,000. The great thing is, the data contained in the AnnualTurnover field does not necessarily have to be displayed on the form or report, as long as it is stored in the form or reports underlying Record Source. In order to do this, we would enter an expression for the condition.
So let's take a look at how we go about applying Conditional Formatting using the example of a Student Exam Results Report. The report applies conditional formatting based on the students exam result. Students records with a result above 74 % are displayed in green, and those below 40 %, in red. The formatting for those in between is set to blue by default. To enhance clarity, I have also applied a sort on the Results field, thereby ordering the records from highest result to lowest. If you wish, you can download the complete solution by clicking the link below:
Student Exam Results
Our example database contains a table, tblExamResults, and report, rptExamResults- the table being the Record Source for the report. Our table contains a list of student names and their corresponding exam results:
 |
| Figure 1: tblExamResults - The Record Source for our Report. |

Applying Conditional Formatting.
To begin with, lets look at how we apply Conditional Formatting to the Result field of rptExamResults.
- Open the report in DESIGN VIEW
- Right click the Result Text Box.
- Click CONDITIONAL FORMATTING from the drop down menu.
- When the CONDITIONAL FORMATTING dialog form opens, set the conditions as described in the next stage of the process below.
 |
| Figure 2: The Conditional Formatting dialog form. It is possible to have a maximum of three different conditions plus the default formatting. |
Setting Conditions based on FIELD VALUE IS
The next stage is to set the actual conditions for the Result field of the report (see Figure 2 above). NB: when FIELD VALUE IS is selected, it refers to the value contained in the text box being formatted:
- First set the DEFAULT FORMATTING section so it displays a BLUE FONT. Do this by selecting BLUE from the FONT/FORE COLOR icon
- Next set CONDITION 1 so that a BOLD GREEN FONT displays when the FIELD VALUE IS GREATER THAN 74. If necessary click the drop down list to select FIELD VALUE IS, and then do the same in the next combo box along to select GREATER THAN. Then just enter the value 74 in the third box along, and select the BOLD and RED icons. You should see a preview in the box below when done.
- Click the ADD >> button to show CONDITION 2.
- Repeat the process of stage 2 so that a BOLD RED FONT displays when FIELD VALUE IS LESS THAN 40.
- Click OK to close.
Setting Conditions based on EXPRESSION IS
The next stage is to set the conditions for the StudentId field. Since we are not basing the condition on the value contained in the StudentId field itself, we need to construct an expression which refers to the value contained in the Results field. As such, we shall be selecting EXPRESSION IS from the appropriate drop down lists, rather than FIELD VALUE IS.
- Again, set the DEFAULT FORMATTING section so it displays a BLUE FONT. Do this by selecting BLUE from the FONT/FORE COLOR icon
- Next set CONDITION 1 so that a BOLD GREEN FONT displays when the EXPRESSION IS [Results]>=75. Do this by clicking the drop down list to select EXPRESSION IS, and then enter the expression in the elongated box (see Figure 3 below). Then select the BOLD and RED icons as before.
- Click the ADD >> button to show CONDITION 2.
- Repeat the process of stage 2 so that a BOLD RED FONT displays when EXPRESSION IS [Results]<40
- Click OK to close.
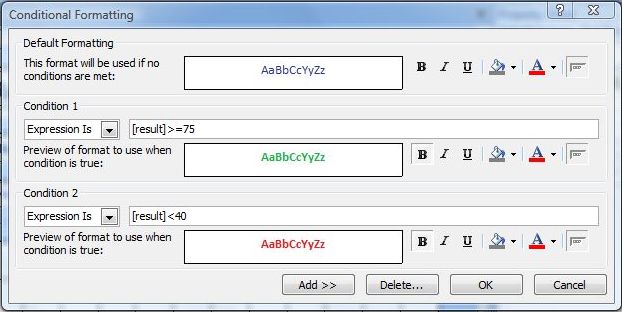 |
| Figure 3: Condition based on EXPRESSION IS. Note the elongated box where the expression is entered. This appears when EXPRESSION IS is selected from the drop down list. |


No comments:
Post a Comment